Friday, December 09, 2016

Carol: A Free Crochet Doily Pattern For You

One of the reasons I love the Facebook group Threadies so much is that it gives me the opportunity to meet and get to know other crocheters and designers better. Carol Thompson-Coolbeth was one of the first folks to join the group when it was started a couple of years ago. I loved her lovely, colorful doilies, and was impressed when I learned that she designed many of them herself. When I admired some of the beautiful shaded threads that she used in her doilies, she generously sent me some from her stash. She said she had purchased them years ago, and now only used them for special doilies, as they were no longer available for purchase. I was touched by her kindness, and decided that I, too, would save the thread for a very special project.
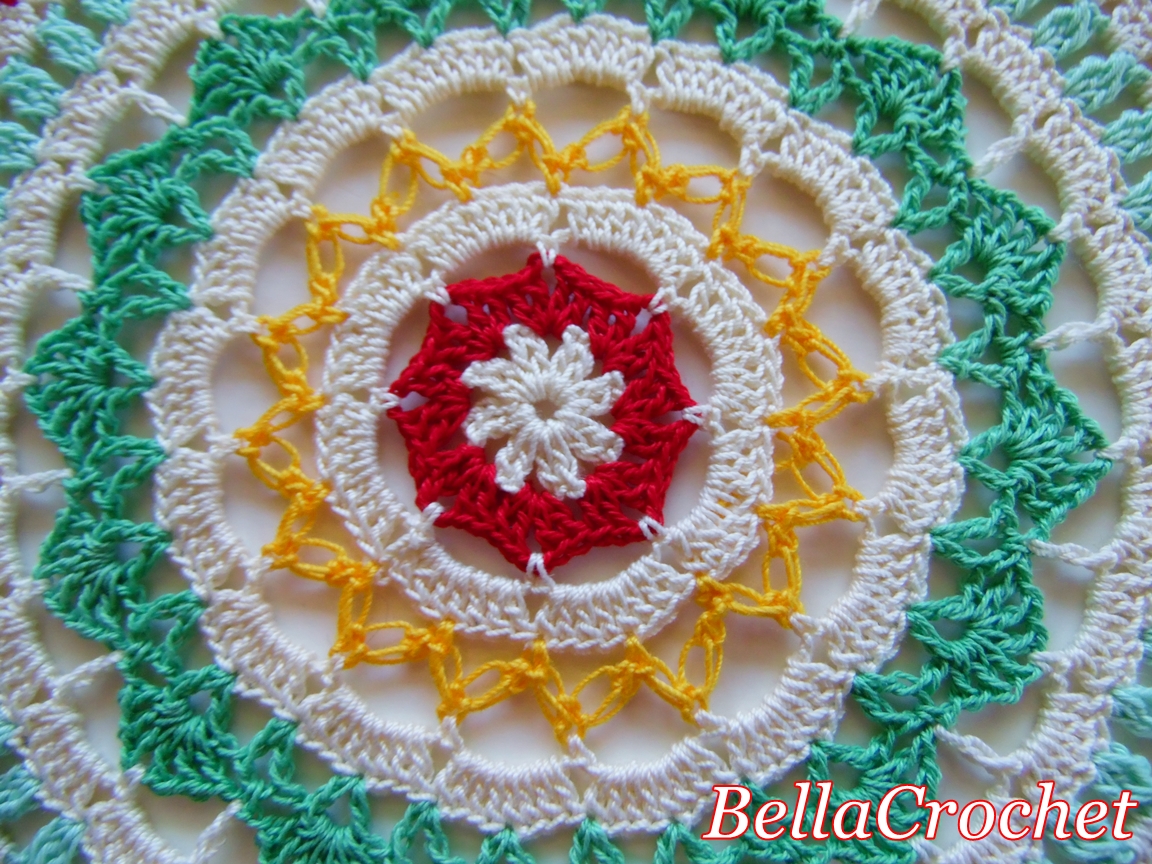
Last week, I was shocked and saddened to hear of Carol's passing. But, I knew almost immediately that the time had come to use the thread she had sent me, by creating a special doily in Carol's memory. Carol loved to use lots of flowers, butterflies and bright colors in her designs, and her first published design was a double pineapple. I tried to combine these things into a doily that would honor her, using the lovely vintage thread that she had sent me.
Carol was an incredibly talented designer. She was always willing to share her vast knowledge of thread crochet by helping anyone who had a question, no matter how small or complicated it was. She added beauty to the world through her designs, her kindness and her generosity. She will be greatly missed. 
Carol
designed by Elizabeth Ann White
for BellaCrochet

Size: About 15” across

Skill Level: Intermediate- for those who are familiar with working with size 10 thread and steel hooks, and who have a thorough understanding of the basics of crochet

Materials:
Size 10 Crochet Cotton Thread
  100 yards White
  50 yards each Shaded Pinks and Shaded Yellow
  25 yards each Shaded Purple and Shaded Green
Fabric Glue and toothpick (for applying glue)
Size 7 (1.65 mm) Steel Crochet Hook

Special Stitches:
For Shell: (3 dc, ch 2, 3 dc) in st or ch sp indicated 

For 3 dc cluster: Yo, insert hook in sp indicated, yo, pull through, yo, pull through 2 lps on hook, (yo, insert hook in same sp, yo, pull through, yo, pull through 2 lps on hook) 2 times, yo, pull through all 4 lps on hook.

Doily
Center Rose
Rnd 1: With shaded pinks, ch 6, sl st in first ch to form ring; ch 1, (sc in ring, ch 2) 8 times, join with sl st in first sc. (8 ch-2 sps made)

Rnd 2: Ch 1, (sc, ch 1, 3 dc, ch 1, sc) in each ch-2 sp around, join. (8 petals made)

Rnd 3: Working behind petals, ch 3, (sl st between next 2 petals, ch 3) around, join with sl st in first ch of beg ch-3.

Rnd 4: Ch 1, (sc, ch 1, 5 dc, ch 1, sc) in each ch-3 sp around, join with sl st in first sc.

Rnd 5: Working behind petals, ch 4, (sl st between next 2 petals, ch 4) around, join with sl st in first ch of beg ch-4.

Rnd 6: Ch 1, (sc, ch 1, 7 dc, ch 1, sc) in each ch-4 sp around, join with sl st in first sc.

Rnd 7: Working behind petals, ch 5, (sl st between next 2 petals, ch 5) around, join with sl st in first ch of beg ch-5.

Rnd 8: Ch 1, (sc, ch 1, 9 dc, ch 1, sc) in each ch-5 sp around, join with sl st in first sc.

Rnd 9: Working behind petals, ch 6, (sl st between next 2 petals, ch 6) around, join with sl st in first ch 0f beg ch-6.

Rnd 10: Ch 1, (sc, ch 1, 11 dc, ch 1, sc) in each ch-6 sp around, join with sl st in first sc.

Rnd 11: Working behind petals, ch 7, (sl st between next 2 petals, ch 7) around, join with sl st in first ch of beg ch-7. Fasten off.

First Pineapple
Row 12: Working behind petals, join white with sl st in first ch-7 sp, (ch 3, 2 dc, ch 2, 3 dc) in same sp as joining, ch 3, (dc, ch 3, dc) in next ch-7 sp, ch 3, shell (see Special Stitches) in next ch-7 sp; leaving remaining sps unworked, turn.

Row 13: Ch 3, shell in ch-2 sp of first shell, ch 3, skip next ch-3 sp, 11 dc in next ch-3 sp, ch 3, skip next ch-3 sp, shell in ch-2 sp of last shell, turn.

Row 14: Ch 3, shell in ch-2 sp of first shell, ch 3, skip next ch-3 sp, 2 dc in next dc, (dc in next dc, 2 dc in next dc) 5 times, ch 3, skip next ch-3 sp, shell in ch-2 sp of last shell, turn.

Row 15: Ch 3, shell in ch-2 sp of first shell, ch 3, skip next ch-3 sp, dc in next dc, (ch 1, dc in next dc) 16 times, ch 3, skip last ch-3 sp, shell in last shell, turn.

Row 16: Ch 3, shell in ch-2 sp of first shell, ch 3, skip next ch-3 sp, (sc in next ch-1 sp, ch 3) 16 times, skip last ch-3 sp, shell in ch-2 sp of last shell, turn.

Row 17: Ch 3, shell in ch-2 sp of first shell, ch 3, skip next ch-3 sp, (sc in next ch-3 sp, ch 3) 15 times, skip last ch-3 sp, shell in ch-2 sp of last shell, turn.

Row 18: Ch 3, shell in ch-2 sp of first shell, ch 3, skip next ch-3 sp, (sc in next ch-3 sp, ch 3) 14 times, skip last ch-3 sp, shell in ch-2 sp of last shell, turn.

Row 19: Ch 3, shell in ch-2 sp of first shell, ch 3, skip next ch-3 sp, (sc in next ch-3 sp, ch 3) 13 times, skip last ch-3 sp, shell in ch-2 sp of last shell, turn.

Row 20: Ch 3, shell in ch-2 sp of first shell, ch 3, skip next ch-3 sp, (sc in next ch-3 sp, ch 3) 12 times, skip last ch-3 sp, shell in ch-2 sp of last shell, turn.

Row 21: Ch 3, shell in ch-2 sp of first shell, ch 3, skip next ch-3 sp, (sc in next ch-3 sp, ch 3) 11 times, skip last ch-3 sp, shell in ch-2 sp of last shell, turn.

Row 22: Ch 3, shell in ch-2 sp of first shell, ch 3, skip next ch-3 sp, (sc in next ch-3 sp, ch 3) 10 times, skip last ch-3 sp, shell in ch-2 sp of last shell, turn.

Row 23: Ch 3, shell in ch-2 sp of first shell, ch 3, skip next ch-3 sp, (sc in next ch-3 sp, ch 3) 9 times, skip last ch-3 sp, shell in ch-2 sp of last shell, turn.

Row 24: Ch 3, shell in ch-2 sp of first shell, ch 3, skip next ch-3 sp, (sc in next ch-3 sp, ch 3) 8 times, skip last ch-3 sp, shell in ch-2 sp of last shell, turn.

Row 25: Ch 3, shell in ch-2 sp of first shell, ch 3, skip next ch-3 sp, (sc in next ch-3 sp, ch 3) 7 times, skip last ch-3 sp, shell in ch-2 sp of last shell, turn.

Row 26: Ch 3, shell in ch-2 sp of first shell, ch 3, skip next ch-3 sp, (sc in next ch-3 sp, ch 3) 6 times, skip last ch-3 sp, shell in ch-2 sp of last shell, turn.

Row 27: Ch 3, shell in ch-2 sp of first shell, ch 3, skip next ch-3 sp, (sc in next ch-3 sp, ch 3) 5 times, skip last ch-3 sp, shell in ch-2 sp of last shell, turn.

Row 28: Ch 3, shell in ch-2 sp of first shell, ch 3, skip next ch-3 sp, (sc in next ch-3 sp, ch 3) 4 times, skip last ch-3 sp, shell in ch-2 sp of last shell, turn.

Row 29: Ch 3, shell in ch-2 sp of first shell, ch 3, skip next ch-3 sp, (sc in next ch-3 sp, ch 3) 3 times, skip last ch-3 sp, shell in ch-2 sp of last shell, turn.

Row 30: Ch 3, shell in ch-2 sp of first shell, ch 3, skip next ch-3 sp, (sc in next ch-3 sp, ch 3) 2 times, skip last ch-3 sp, shell in ch-2 sp of last shell, turn.

Row 31: Ch 3, shell in ch-2 sp of first shell, ch 3, skip next ch-3 sp, sc in next ch-3 sp, ch 3, skip next ch-3 sp, shell in ch-2 sp of last shell, turn.

Row 32: Ch 3, shell in ch-2 sp of first shell, shell in ch-2 sp of last shell. Fasten off.

Edging
NOTE:
When working the Edging, you will be working in the ch-3 sps at beginning of rows (these are sometimes called “turning chs”), in the worked ch-2 sps of shells at the ends of rows (these spaces already have the last shell of the next row worked in them--insert hook beside the base of the shell-- see photo) and in the ch-2 sps at the center of the shells on Row 32.

For Edging, work steps A-C:
A: Join shaded green with sc in worked ch sp of first shell, ch 3 (sc, ch 3, sc) in first ch-3 sp, ch 3, *sc in ch-2 sp of next shell, ch 3, (sc, ch 3, sc) in next ch-3 sp, ch 3; repeat from * across first side of pineapple;

B: for Pineapple Point, working in ch-2 sps of shells on last row of Pineapple, 3 dc cluster (see Special Stitches) in first shell, ch 6, sl st in 6th ch from hook, ch 7, sl st in same ch last sl st was worked in, ch 5, sl st in same ch last 2 sl sts were worked in, 3 dc cluster in last shell, ch 3, sl st in last st of last shell, ch 3;


C: to work Edging on remaining side of Pineapple (going back toward Center Rose), sc in worked ch-2 sp of next shell, ch 3, *(sc, ch 3, sc) in next ch-3 sp, ch 3, sc in ch sp of next shell; repeat from * across, ch 3, sc in same ch-7 sp on Rnd 11 that last shell was worked in. Fasten off.


Second Pineapple
Row 12: Skip next ch-7 sp on Rnd 11 of Center Rose, working behind petals, join white with sl st in first ch-7 sp, (ch 3, 2 dc, ch 2, 3 dc) in same sp as joining, ch 3, (dc, ch 3, dc) in next ch-7 sp, ch 3, shell in next ch-7 sp; leaving remaining sp unworked, turn.

Rows 13-32 and Edging: Work the same as for First Pineapple.

Butterfly (make 2)
Note: Wings are worked in Rounds, forming a circle of 8 small individual wings. Finished Wings will be folded in half length wise, to form 2 layers of 4 wings each.

Wings
Rnd 1: With shaded yellow, ch 6, join with sl st in first ch to form ring, ch 1, (sc in ring, ch 3) 8 times, join with sl st in first sc. (8 ch-3 sps made)

Rnd 2: (Sl st, ch 3, dc, ch 2, 2 dc, ch 1) in first ch-3 sp, (2 dc, ch 2, 2 dc, ch 1) in each remaining ch-3 sp around, join with sl st in top of ch-3.

Rnd 3: Sl st into first ch-2 sp, (ch 3, 2 dc, ch 2, 3 dc) in first ch-2 sp, ch 5, skip next ch-1 sp, *(3 dc, ch 2, 3 dc) in next ch- 2 sp, ch 5, skip next ch-1 sp; repeat from * around, join.

Rnd 4: Sl st across into first ch-2 sp, ch 5 (counts as first tr, ch 1), (tr, ch 1) 8 times in first ch-2 sp, working over ch-5 sp, sc in first ch-1 sp of Rnd 2, ch 1; *(tr, ch 1) 9 times in next ch-2 sp, working over next ch-5 sp, sc in next ch-1 sp on Rnd 2, ch 1; repeat from * around, join with sl st in 4th ch of ch-5. Fasten off.

Rnd 5: Join shaded purple with sc in first sc, ch 3, skip next ch-1 sp and tr, (sc in next ch sp, ch 3) 8 times, skip next tr and next ch-1 sp, *sc in next sc, ch 3, skip next ch-1 sp and next tr, (sc in next ch sp, ch 3) 8 times, skip next tr and next ch-1 sp; repeat from * around, join with sl st in first sc. Fasten off. (8 wings made)

Body
With shaded purple, (ch 4, 3 dc cluster -see Special Stitches-in fourth ch from hook) 3 times, (ch 9, sl st in 4th ch from hook, sl st in each remaining ch, sl st in top of last 3-dc cluster made) 2 times for antenna. Fasten off.


Leaf Spray (make 2)
Note: For Picot, (ch 3, sl st in 3rd ch from hook)
With shaded green, ch 12, (3 tr, picot-see Note-3 tr, ch 4, sl st) in 6th ch from hook, sl st in next ch, ch 9, (3 tr, picot, 3 tr, ch 4, sl st) in 6th ch from hook, sl st in next 3 chs, ch 7, (3 tr, picot, 3 tr, ch 4, sl st) in 6th ch from hook, sl st in next ch, sl st in each remaining ch of beginning ch-12 for stem. Fasten off.


Finishing
Note: When gluing items, it is helpful to place a drop of fabric glue on the tip of a toothpick; use the toothpick to precisely apply glue to desired spot. 
1: Place all pieces on blocking surface, folding Butterfly Wings in half to form two layers of 4 wings each. Spray all pieces with spray starch, shape and allow to dry.

2: Glue one Body to each set of Butterfly Wings. Allow to dry.

3: Glue Butterflies to doily as shown in photo. Glue Leaf Sprays to Doily as shown. Allow to dry. 


Special thanks go to Jewel Fernley  and Rosina Smith for testing this  pattern. I don't know what I would do without my awesome testers!!!!


If you would like to purchase an ad-free copy of this pattern for a small fee, please visit my Etsy shop:  Carol


I am offering a paid version of this pattern for the convenience of  my customers who prefer an easy to read, printable and ad-free PDF. You will be able to easily save the pattern to your Etsy account as well as your computer or other device.
Copyright BellaCrochet 2016. All rights reserved. Please do not redistribute or share this pattern; do not post it (or any portion of it) on any website. DO NOT make videos or tutorials of it for distribution on YouTube or any other site. You may share the link to the pattern only (and link shares are greatly appreciated, please tell your crocheting friends who might enjoy this pattern!) This pattern has been tested for accuracy and clarity, and I can offer no additional information, photos or help with it.
 If you have enjoyed this design, I hope you will check out my other free patterns:


Friday, December 02, 2016

Sweet Memories Mandala Doily: A Free Crochet Pattern For You


Sweet Memories Mandala Doily

by Elizabeth Ann White

for BellaCrochet

Please Note: This design incorporates Double Love Knots in Rnds 5, 14 and 15. If you are not familiar with Double Love Knots, you can learn more about them here: Love Knot Tutorial

Size: About 14” across Materials:
Size 10 Cotton Crochet Thread:
 150 yards main color (called Color A in the pattern)
 75 yards each of 4 different accent colors (called Color B, C, D, or E in pattern)
Size 7 (1.65 mm) steel crochet hook

Skill Level: Intermediate- for those who are familiar with working with size 10 thread and steel hooks, and who have a thorough understanding of the basics of crochet

Special Stitches:
For step by step tutorial on how to make Double Love Knot (dlk), see:
http://bellacrochet.blogspot.com/2011/05/love-knots-tutorial.html
Make all lps on Double Love Knots 1/4” throughout

For 2 dc cluster: Yo, insert hook in st or ch sp indicated, yo, pull lp through, yo, pull through 2 lps on hook, yo, insert hook in same st or ch sp, yo, pull lp through, yo, pull through 2 lps on hook, yo, pull through all 3 lps on hook

For 3 dc cluster: Yo, insert hook in st or ch sp indicated, yo, pull lp through, yo, pull through 2 lps on hook, (yo, insert hook in same st or ch sp, yo, pull through, yo, pull through 2 lps on hook) 2 times, yo, pull through all 4 lps on hook

For Picot: (sc, ch 3, sc) in ch sp indicated

Doily
Rnd 1: With color A (main color), ch 6, sl st in first ch to form ring; ch 3, dc in ring, ch 2, (2 dc in ring, ch 2) 7 times, join with sl st in top of ch-3. Fasten off. (8 ch-2 sps made)

Rnd 2: Join color B with sl st in first ch-2 sp, (ch 3, dc, ch 2, 2 dc) in same sp as joining, (2 dc, ch 2, 2 dc) in each remaining ch-2 sp around, join. Fasten off. (8 ch-2 sps made)

Rnd 3: Join color A with sc in first ch-2 sp, ch 6, (sc in next ch-2 sp, ch 6) around, join with sl st in first sc.

Rnd 4: (Sl st, ch 3, 7 dc) in first ch-6 sp, 8 dc in each remaining ch-6 sp around, join with sl st in top of ch-3. Fasten off. (Ch-3 counts as first dc now and throughout; 64 dc made)

Note: Make all lps on Double Love Knots 1/4” long

Rnd 5: Join color C with sc in first st, double love knot (see dlk tutorial) skip next 3 dc, (sc in next dc, dlk, skip next 3 dc) around, join with sl st in first sc. Fasten off.

Rnd 6: Join color A with sc in center sc of first dlk, ch 6, (sc in center sc of next dlk, ch 6) around, join with sl st in first sc.

Rnd 7: (Sl st, ch 3, 7 dc) in first ch-6 sp, 8 dc in each remaining ch-6 sp around, join. Fasten off.


Rnd 8: Join color D with sl st in first st, (ch 5, dc) in same st as joining, ch 1, skip next 3 dc, *(dc, ch 2 dc) in next st, ch 1, skip next 3 dc; repeat from * around, join with sl st in 3rd ch of ch-5.

Rnd 9: (Sl st, ch 1, sc) in first ch-2 sp, ch 1, (dc, ch 1) 6 times in next ch-2 sp (first fan made), *sc in next ch-2 sp, ch 1, (dc, ch 1) 6 times in next ch-2 sp; repeat from * around, join with sl st in first sc. Fasten off. (16 fans made)

Rnd 10: Join A with sc in 4th ch-1 sp (the center ch-1 sp of first fan), ch 5, dc in next sc, ch 5, (sc in center ch-1 sp of next fan, ch 5, dc in next sc, ch 5) around, join with sl st in first sc.

Rnd 11: (Sl st, ch 3, 5 dc) in first ch-5 sp, 6 dc in each remaining ch-5 sp around, join with sl st in top of ch-3. Fasten off.

Rnd 12: Join color E with sl st in first st, (ch 2, 2 dc cl—see Special Stitches) in same st as joining, ch 3, skip next 2 dc, (3 dc cl—see Special Stitches-- in next st, ch 3, skip next 2 dc) around, join with sl st in top of 2-dc cl. Fasten off.

Rnd 13: Join color A with sl st in first ch-3 sp, (ch 3, 2 dc) in same sp as joining, 3 dc in each remaining ch-3 sp around, join. Fasten off.

Rnd 14: Join color B with sc in first st, dlk, skip next 3 dc, (sc in next dc, dlk, skip next 3 dc) around, join.

Rnd 15: Ch 3, sc in sc at center of first dlk, dlk, (sc in sc at center of next dlk, dlk) around, join with sl st in first sc. Fasten off.

Rnd 16: Join color A with sc in sc at center of first dlk, ch 6, (sc in sc at center of next dlk, ch 6) around, join.

Rnd 17: (Sl st, ch 3, 5 dc) in first ch-6 sp, 6 dc in each ch-6 sp around, join. Fasten off.

Rnd 18: Join color C with sl st in first st, (ch 5, dc) in same sp as joining, skip next 2 dc, *(dc, ch 2, dc) in next dc, skip next 2 dc; repeat from * around, join with sl st in 3rd ch of ch-5. Fasten off.

Rnd 19: Join color A with sc in first ch-2 sp, ch 1, (2 dc, ch 2, 2 dc) in next ch-2 sp, ch 1, *sc in next ch-2 sp, ch 1, (2 dc, ch 2, 2 dc) in next ch-2 sp, ch 1; repeat from * around, join with sl st in first sc. Fasten off.

Rnd 20: Join color D with sc in first ch-2 sp, (3 dc, ch 2, 3 dc) in next sc, *sc in next ch-2 sp, (3 dc, ch 2, 3 dc) in next sc; repeat from * around, join with sl st in first sc. Fasten off.

Rnd 21: Join A with sc in first ch-2 sp, (4 dc, ch 2, 4 dc) in next sc, *sc in next ch-2 sp, (4 dc, ch 2, 4 dc) in next sc; repeat from * around, join with sl st in first sc. Fasten off.

Rnd 22: Join color E with sc in first ch-2 sp, (ch 3, sc) in same sp as joining (beginning picot made), ch 3, sc in next sc, ch 2, 9 dc in next ch-2 sp, ch 2, sc in next sc, ch 3, *picot (see Special Stitches) in next ch-2 sp, ch 3, sc in next sc, ch 2, 9 dc in next ch-2 sp, ch 2, sc in next sc, ch 3; repeat from * around, join with sl st in first sc. Fasten off.

Rnd 23: Join color A with sc in ch-3 sp of beginning picot, (ch 3, sc) in same sp as joining (beginning picot made), ch 1, (dc in next dc, ch 1) 9 times, *picot in ch-3 sp of next picot, ch 1, (dc in next dc, ch 1) 9 times; repeat from * around, join. Fasten off.

Rnd 24: Join color B with sc in ch-3 sp of beginning picot, (ch 3, sc, ch 5, sc, ch 3, sc) in same sp as joining, skip next ch-1 sp, sc in next ch-1 sp, (ch 3, sc in next ch-1 sp) 7 times, skip next ch-1 sp, *(sc, ch 3, sc, ch 5, sc, ch 3, sc) in ch-3 sp of next picot, skip next ch-1 sp, sc in next ch-1 sp, (ch 3, sc in next ch-1 sp) 7 times, skip next ch-1 sp; repeat from * around, join. Fasten off. 

Special thanks go to Jewel Fernley, Jolene Ortiz, and Rosina Smith for testing this  pattern. I don't know what I would do without my awesome testers!!!!

Copyright BellaCrochet 2016. All rights reserved. Please do not redistribute or share this pattern; do not post it (or any portion of it) on any website. DO NOT make videos or tutorials of it for distribution on YouTube or any other site. You may share the link to the pattern only (and link shares are greatly appreciated, please tell your crocheting friends who might enjoy this pattern!) This pattern has been tested for accuracy and clarity, and I can offer no additional information, photos or help with it.


 If you have enjoyed this design, I hope you will check out my other free patterns:


Monday, November 28, 2016

And the Winner Is:

The Winner of the Threadie's Second Anniversary Contest is:
 Carolyn Hirning-Edelen!
Carolyn, if you will send me an email with your mailing address at:
bellacrochet.info@yahoo.com
I will get the songbird thread holder out to you right away. (It is up to you how you use it, lol!)
Thanks to everyone who entered!!!


Monday, November 14, 2016

Happy Anniversary to Threadies! A Contest!

Time really does fly when you are having fun; it has been two years now since I told my friend and fellow designer Cylinda Mathews, "I wish there was a Facebook group just for thread crochet. I think I will start one." And even though I didn't have a clue how to go about it, I did.
As I say, time flies, and the group now has over 8,000 members! If you are not already a member, I hope you will stop by and join us. The talent of the members is truly amazing, I can't wait to see the photos they post every day!
https://www.facebook.com/groups/Threadies/
So, to celebrate the Threadies second birthday, I though we should have a contest, and I knew the perfect item to use for the prize:
The bird screws off the top so you can put the thread on the stand.

During our second CAL (crochet along) back in Feb. 2015, I posted this picture of my work in progress:

We were making the Diamond Points Doily, designed by Cylinda Mathews:

My doily got a few of the usual "how pretty" comments, but what really caught everyone's attention was my thread holder. I had to confess, it was actually intended to be a toilet paper holder that I had bought off Ebay a few years ago. A lot of the members fell in love with it, and several actually ordered their own stands! 
I thought it might make a prize a Threadie would enjoy so I ordered a brand new one just for this contest. 
Here is the information on the contest and the rules:
1: I will give one person the thread holder/toilet paper stand (use it however you desire!) pictured in the first photo above (no thread or doilies will be included) 
2: The contest is open to all members of the Threadies Facebook group and to readers of my blog (although I hope you will be both!)
3: The box will be shipped via USPS Priority Mail.

4: The contest will run from today (Nov. 14th) through  Nov. 27th 2016. 
5: I will select the winner at random from all comments left on this post and announce the winner's name here on the morning of Nov. 28th, so please be sure to check back to see if you won.  
6: Only comments left on this post will be entered; comments left on Facebook, emails, etc. WILL NOT be eligible to win (it is too difficult to coordinate comments left in different places.) Only one entry per person, please! 
7: If the winner does not contact me within 7 days of the end of the contest, I will select a new winner, and the prize will be awarded to them. Failure to contact me within 7 days will result in forfeiture of the prize.
 8: If you post anonymously, please be sure I have a way to identify you (at least give your first name or a nick name in your comment; I have no way of knowing who is posting.)


To enter, just leave a comment answering this question:
What is your favorite thing to crochet with thread?


This contest is now closed! 

Thursday, November 03, 2016

Marla's Magic Colorfast Solution: A Formula to Keep Red Crochet Thread From Bleeding

Marla Austin is an extremely talented crocheter who has overcome adversity to become a  respected and accomplished crochet artist. 
Marla's beautiful work is highly sought after; she sells her gorgeous pieces both through her Etsy shop and through an annual local event. She also takes custom orders for larger items, such as this magnificent bedspread she is currently working on:

Marla tells how she began selling her crocheted work:
"In 2004, I was rescued from 2 years of homelessness by the kindness of a stranger, who turned out to be the best man I've ever known (other than my father). Unable to work and bored, I started crocheting, brushing off skills learned long ago as a little girl, quite literally, sitting on the floor at my Grandmother's feet. My first project was a queen-sized bedspread that used 2 strands of thread together,. By using two strands at a time, I was able to create six shades from three colors. It took a full year to make and turned out too heavy to use!
Marla's 30 pound bedspread!
Not long after, a friend told me that the local arts center was putting together an exhibit showcasing area artists. At first, they weren't interested in doilies; that is, until they saw my work. I was so moved by their display that I knew I had to share my love for this beautiful art form with as many people as I could (and maybe make a little spending money on the side). Thus began my dream. In Dec. 2008, I became a vendor at the S.P.B.H. Folk Art Festival held in Libearl, Kansas and did so well my first year that it's become an annual event for me.( By the way, SPBH stands for "Society for the Prevention of Bored Housewives". I remember hearing about it when I was in high school in Garden City Ks.; its been around that long.) Now my dream is well on it's way. In fact, I guess you could say it's been fulfilled. Less than a month after opening my internet shop, my first item sold, and I became an international seller at the same time. "Every piece made with loving prayer" is the quote on the back of my business card and is literal. I thank God for the loving Grandmother who taught me this craft, for the skill I have since acquired, for the blessings God has given me. I hope and pray His peace and grace be with every recipient of my work."
Marla's work is certainly inspiring:

Marla turned the Pretty Pinwheel Doily into a bowl!
And she  made the  Trick or Treat Doily  into a sun-catcher!

But, there is an additional reason that I admire Marla; she came across a solution that will set the dye in dark colored thread so that it does not bleed onto lighter colors. If you have ever had a red and white Christmas doily turn into a pink, blotchy mess after it was washed, then you know what I am talking about! Marla has generously agreed to share the recipe for this "Magic Solution" with us today:

Marla's Colorfast Solution
1 tablespoon salt
1 cup white vinegar
2 quarts water
Soak piece in solution until thoroughly saturated. Blot and block or finish as usual.
Some people rinse their pieces to remove any lingering vinegar aroma. I’ve never had a problem with any residual odor, and I don’t rinse afterward.
Store solution in a glass container.
NOTE: Marla says that the solution, MUST be stored in a glass container, not a plastic one. She uses canning jars to store hers.  


Thank you, Marla, for sharing your story and the recipe for the marvelous Colorfast Solution! It will certainly make life much easier for many of us!

You can see more of Marla's work in her Etsy shop:

You can follow Marla on her Facebook page:
https://www.facebook.com/PanhandleanniesVintageCrochet/

Wednesday, March 09, 2016

Mavanee's Roses: A Free Crochet Pattern For You

I am pleased to share this free pattern with you; this doily was named for my mother, Mavanee Joann, who loved roses and taught me how to crochet. I hope you will enjoy it!


Mavanee's Roses
by Elizabeth Ann White
for BellaCrochet
Size: About 13” across

Skill Level: Intermediate- for those who are familiar with working with size 10 thread and steel hooks, and who have a thorough understanding of the basics of crochet 


Materials: 
Size 10 Crochet Cotton Thread: 
  200 yards brown 
  100 yards dk green 
  100 yards dk red 
Fabric glue 
Heavy Starch 
Size 7 (1.65mm) steel hook


Doily 
Rnd 1: With red, ch 6, sl st in first ch to form ring; ch 1, (sc in ring, ch 2) 6 times, join with sl st in first sc. (6 ch-2 sps made)


Rnd 2: Ch 1, (sc, ch 1, 3 dc, ch 1, sc)  in each ch-2 sp around, join with sl st in first sc. (6 petals made)

Rnd 3: Working behind petals, ch 3, (sl st between next 2 petals, ch 3) around, join with sl st in first ch of beg ch-3. 

Rnd 4: Ch 1, (sc, ch 1, 5 dc, ch 1, sc) in each ch-3 sp around, join with sl st in first sc. 

Rnd 5: Working behind petals, ch 4, (sl st between next 2 petals, ch 4) around, join with sl st in first ch of beg ch-4.

Rnd 6: Ch 1, (sc, ch 1, 3 dc, tr, 3 dc, ch 1, sc) in each ch-4 sp around, join with sl st in first sc. Fasten off. 

Rnd 7: Join green with sc in center tr of any petal on last rnd, ch 10, (sc in center tr on next petal, ch 10) around, join with sl st in first sc. (6 ch-10 sps made)

Rnd 8: Ch 1, (sc, ch 3, 2 dc) 4 times in each ch-10 sp around, join with sl st in first sc. Fasten off. 

Rnd 9: Join brown with sc in first ch-3 sp, ch 5, (sc in next ch-3 sp, ch 5) around, join with sl st in first sc. (24 ch-5 sps made)

Rnd 10: Sl st to center of first ch-5 sp, (ch 1, sc) in first ch-5 sp, ch 6, (sc in next ch-5 sp, ch 6) around, join with sl st in first sc. 

Rnds 11 & 12: Sl st to center of first ch-6 sp, (ch 1, sc) in first ch-6 sp, ch 6, (sc in next ch-6 sp, ch 6) around, join with sl st in first sc. At end of last rnd, fasten off. 

Rnd 13: Join green with sc in first ch-6 sp, (6 dc, ch 2, 6 dc) in next ch-6 sp, *sc in next ch-6 sp, (6 dc, ch 2, 6 dc) in next ch-6 sp; repeat from * around, join with sl st in first sc. Fasten off. 

Rnd 14: Join brown with sl st in first ch-2 sp,  ch 4 (counts as first dc and ch-1 sp), (3 dc, ch 1, dc) in same ch-2 sp as joining, ch 9, *(dc, ch 1, 3 dc, ch 1, dc) in next ch-2 sp, ch 9; repeat from * around, join with sl st in 3rd ch of first ch-4.  

Rnd 15: Ch 4 (counts as first dc and  ch-1 sp), 3 dc in first ch-1 sp, ch 1, 3 dc in next ch-1 sp, ch 1, dc in next dc, ch 4, sc in next ch-9 sp, ch 4, *dc in next dc, ch 1, (3 dc in next ch-1 sp, ch 1) 2 times, dc in next dc, ch 4, sc in next ch-9 sp, ch 4; repeat from * around,  join with sl st in 3rd ch of first ch-4. 

Rnd 16: Ch 4, (3 dc in next ch-1 sp, ch 1) 3 times, dc in next dc, ch 4, skip next 2 ch-4 sps, *dc in next dc, ch 1, (3 dc in next ch-1 sp, ch 1) 3 times, dc in next dc, ch 4, skip next 2 ch-4 sps; repeat from * around, join with sl st in 3rd ch of first ch-4.

Rnd 17: Ch 4, (3 dc in next ch-1 sp, ch 1) 4 times, dc in next dc, ch 3, skip next ch-4 sp, *dc in next dc, ch 1, (3 dc in next ch-1 sp, ch 1) 4 times, dc in next dc, ch 3, skip next ch-4 sp; repeat from * around, join with sl st in 3rd ch of first ch-4.

NOTE ON JOINING THE NEXT 3 RNDS: At the end of Rnd 18, you will join by working a hdc into the top of the first ch-3 of the round; this will create the last ch-2 sp of the round. You will work into this sp by inserting your hook around the post of the hdc. In Rnds 19 and 20, you will join with a sc in the top of the first ch-3 to create the last ch-1 sp of the round. You will work into this sp by inserting your hook around the sc st. 

Rnd 18: Sl st into first ch-1 sp, (ch 3, 2 dc) in first ch-1 sp, (ch 1, 3 dc in next ch-1 sp) 4 times, ch 2,  skip next ch-3 sp,  *3 dc in next ch-1 sp, (ch 1, 3 dc in next ch-1 sp) 4 times, ch 2, skip next ch-3 sp; repeat from * 10 more times, 3 dc in next ch-1 sp, (ch 1, 3 dc in next ch-1 sp) 4 times,  join with hdc in top of first ch-3 to form  ch-2 sp.  

Rnd 19: (Ch 3, 2 dc) in first ch-2 sp, (ch 1, 3 dc in next ch-1 sp) 2 times, *ch 5, 3 dc in next ch-1 sp, ch 1, 3 dc in next ch-1 sp, ch 1, 3 dc in next ch-2 sp, (ch 1, 3 dc in next ch-1 sp) 2 times; repeat from * 10 more times, ch 5, 3 dc in next ch-1 sp, ch 1, 3 dc in next ch-1 sp, join with sc in top of ch-3 to form ch-1 sp. 

Rnd 20: (Ch 3, 2 dc) in first ch-1 sp, (ch 1, 3 dc in next ch-1 sp) 2 times, *ch 5, dc in next ch-5 sp, ch 5, 3 dc in next ch-1 sp, (ch 1, 3 dc in next ch-1 sp) 3 times; repeat from * 10 more times, ch 5, dc in next ch-5 sp, ch 5, 3 dc in next ch-1 sp, join with sc in top of ch-3 to form ch-1 sp. 

Rnd 21: (Ch 3, 2 dc) in first ch-1 sp, (ch 1, 3 dc in next ch-1 sp) 2 times, ch 5, skip next ch-5 sp, (dc, ch 5, dc) in next dc, ch 5, skip next ch-5 sp, *3 dc in next ch-1 sp, (ch 1, 3 dc in next ch-1 sp) 2 times, ch 5, skip next ch-5 sp, (dc, ch 5, dc) in next dc, ch 5, skip next ch-5 sp; repeat from * around, join with sl st in top of ch-3. 

Rnd 22: Sl st across into first ch-1 sp, (ch 3, 2 dc) in first ch-1 sp, ch 1, 3 dc in next ch-1 sp, ch 5, skip next ch-5 sp, 15 dc in next ch-5 sp, ch 5, skip next ch-5 sp, *3 dc in next ch-1 sp, ch 1, 3 dc in next ch-1 sp, ch 5, skip next ch-5 sp, 15 dc in next ch-5 sp, ch 5, skip next ch-5 sp; repeat from * around, join with sl st in top of ch-3.

Rnd 23: Sl st across into first ch-1 sp, (ch 3, 2 dc) in first ch-1 sp, ch 5, skip next ch-5 sp, dc in first dc of next 15-dc group, (ch 2, skip next dc, dc in next dc) 7 times, ch 5, skip next ch-5 sp, *3 dc in next ch-1 sp, ch 5, skip next ch-5 sp, dc in first dc of next 15-dc group, (ch 2, skip next dc, dc in next dc) 7 times, ch 5, skip next ch-5 sp; repeat from * around, join with sl st in top of ch-3. 

Rnd 24: (Sl st, ch 1, sc) in next st (the center dc of the first 3-dc group), ch 5, skip first ch-5 sp, 3 dc cluster (see Special Stitches) in next ch-2 sp, (ch 3, 3 dc cluster in next ch-2 sp) 6 times, ch 5, *sc in center dc of next 3-dc group, ch 5, skip next ch-5 sp, 3 dc cluster in next ch-2 sp, (ch 3, 3 dc cluster in next ch-2 sp) 6 times, ch 5; repeat from * around, join with sl st in first sc. Fasten off.

Rnd 25: Join green with sc in first sc, ch 3, (sc, ch 3, 2 dc) in next ch-5 sp, (sc, ch 3, 2 dc) in each of next 6 ch-2 sps,  sc in next ch-5 sp, ch 3, *sc in next sc, ch 3, (sc, ch 3, 2 dc) in next ch-5 sp, (sc, ch 3, 2 dc) in each of next 6 ch-3 sps, sc in next ch-5 sp, ch 3; repeat from * around, join with sl st in first sc. Fasten off. 
Doily before adding Rolled Roses and Leaves

Rolled Rose (make 12) 
With red, *ch 3, (hdc, ch 3, sl st) in third ch from hook*; repeat between *and* 7 more times. Fasten off. (8 petals made)
Roll petals to form Rose.

Rose Leaves (make 12) 
With  green, for first leaf, ch 4, [3 dc cluster -see Special Stitches-in 4th ch from hook, ch 3, sl st in 3rd ch from hook (tip of leaf made), ch 3, sl st same ch last 3-dc cl was worked in], ch 6; for second leaf, repeat between [ ];  fasten off.

Finishing 
1: Place doily on blocking surface. Spray with heavy starch, shape and allow to dry. 
2: Glue base of rolled petals on each Rose to hold shape. Allow to dry. 
3: Place Leaves and Roses evenly spaced around doily (see photo.) Glue in place and allow to dry. 
Detail of Rolled Rose and Leaves

Special thanks go to Diana Mitchell and Jewel Fernley for testing this pattern.


Copyright BellaCrochet 2016. All rights reserved. Please do not redistribute or share this pattern; do not post it on any website. DO NOT make videos or tutorials of it for distribution on YouTube or any other site. You may share the link to the pattern only (and link shares are greatly appreciated, please tell your crocheting friends who might enjoy this pattern!)
This pattern has been tested for accuracy and clarity, and I can offer no additional information, photos or help with it.


 If you have enjoyed this design, I hope you will check out my other free patterns: